Z-Watercolorist by Linda Smith
Watercolor Tips
Helpful Ideas
A few ideas to help improve your paintings- especially helpful for beginners!
1. Horizons are always perfectly horizontal. Trees mountains etc. can be added but determine where your horizon is and keep it straight. Also, never divide your paper exactly in half- place the horizon above or below 1/2!
2. Decide before you start where your light source is. This will help you to know where to place darker and lighter tones and keep shadows going all the right direction. I found it helpful to place a tiny pencil X on the edge of my paper to remind myself!
3. Save some white- more rather than less- you can always paint it in if it’s too much but hard to get back. I am getting better at this but trying to do more planning. I found masking fluid really helped me- it was a game changer!
4. Get ideas and inspiration from a reference photo. I can’t tell you how often I started to paint an object then couldn’t remember how it actually looked- branches pointing up or down, ears forward or back, pointed or rounded, how much trunk or branches actually show through foliage, etc. you don’t have to copy it - rather reference it!
5. Almost nothing is one solid color. It has light spots and dark spots. Don’t be afraid to use an unusual color to help with depth, interest, and painterly- ness. There is a place for solid colors , but mostly in illustration- type compositions.
People ask for advice to improve their work. Please feel free to use or ignore whatever works for you! I think any efforts are well worth it! I am so impressed and inspired by the art I’m seeing on this page! A teacher once told me, there is no bad art work, it’s just not done yet! He also told me- paint like a millionaire- if you worry about wasting paper and paint you’ll always restrict yourself from creating a great painting! ❤️!

A few thoughts, tips, and personal preferences
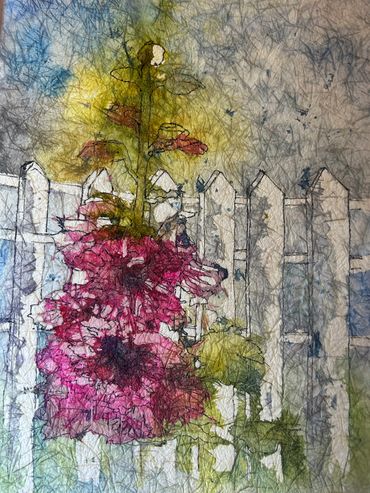
Ginwashi Watercolor Batik
Step by Step Directions
GINWASHI WATERCOLOR BATIK
Supplies
Watercolor supplies (Paints, brushes, water, etc.) Dr PH Martin liquid watercolor recommended
Paraffin wax and wax melter- preferably with a thermostat brushes of various sizes for wax only
2 boards to work on
Freezer paper
Paper towel
Newspaper
Gin Washi paper
Iron
Finish
Glue – Matt Medium, Nori, Yes (One)
Thick watercolor paper - optional
Stretched canvas – optional
Preparation
1. Prepare board/cardboard/foam board – cover with freezer paper- shiny side UP. Tape securely.
2. Wax Pot (Saeuyvb) Best if it has a thermostat so it doesn’t overheat, smoke or ignite. Melt paraffin wax (Gulf Wax available in canning section) It comes in bricks
3. Designate wax brushes – put tape on handles or other method. Once brushes are dipped in wax they are ruined for painting. Suggestions: 1 or 2 fine point, medium round, 1” chip brush. Brushes can be used over again for wax. Soften wax on bristles in warm wax in your wax pot.
4. Newspapers: Place under wax pot and next to it so you don’t drip onto your work surface when moving the brush from pot to paper. Have an iron set up on a board covered with newspaper with a pile of newspaper nearby.
Process:
1. Place your drawing under the ginwashi paper – smooth side up- trace with a fineline waterproof pen that wont bleed when wet. Recommend Pigma Micron pen .05
2. Transfer-Trace drawing to smooth side of the paper. This is on your freezer paper which is shiny side up.
3. Paint melted wax on any areas to remain white. You will not be able to go back to add paint so plan this carefully. Wax dries almost instantly.
4. Paint- light to dark portions of your painting. Watercolor does not need as much water as regular paper and it will spread.
5. DRY paper. Paint wax over areas to be saved. Wax dries quickly so then paint the next leayer- Dry-wax-repeat until completed. Take care when waxing to carefully lift paper after each application so the paper doesn’t adhere to freezer paper.
6. Hair dryer usage. This can be don but carefully as it can melt the wax causing it to move. Use low setting move well above the painting. Lift and dry the other side. It is best to allow the painting to air dry. It can help to place it on a wire rack so air can get underneath.
7. Reminder: lift paper after each waxing to prevent wax from adhering. If it does, remember the paper is very thin and fragile. Use a wide spatula and gently and slowly peel paper up from the workspace.
8. When painting is finished the way you want it- apply wax to the entire surface. Leave a ½-1 inch boarder- this makes it easier to lift.
9. When wax has hardened, crinkle the paper into a ball. Flatten out on work surface.
10. Using a dark or contrasting color spatter on top of crackled was.
11. While paint is still wet, dab wax on top of spatters- do not paint or rub as this will give you large dark blobs instead of smaller batik-type marks. If there are too many spots or spots in places you don’t want- dab them up with paper towel. Then finish dabbing wax on the spots you want.
12. Using a hot-dry iron (cotton setting) place painting between newspaper. Iron until the paper is wax soaked. Change paper and repeat until no more wax is released.
13. Paintings can be fixed in a limited way but because of the wax it can be difficult. No suggestions- just try if you need to.
14. When cool, glue the painting to a sheet of watercolor paper – Thicker paper works well. Coat the paper or wrapped canvas with glue and set paper on it- pressing very gently to get it to adhere. Glue can also be gently painted on the top. Careful- the glue can activate the watercolor. A spray adhesive can be used on top once the bottom glue is dry.

Watercolor Batik